Sunday, July 29, 2012

Backup & Restore SharepointSite

 
C:\Program Files\Common Files\Microsoft Shared\Web Server Extensions\14\BIN>stsa
dm -o backup -url http://praveen:8888 -filename C:\backup\back_8888.bak

stsadm –o restore –url <URL of the site collection> -filename <Name of the backup file> -overwrite
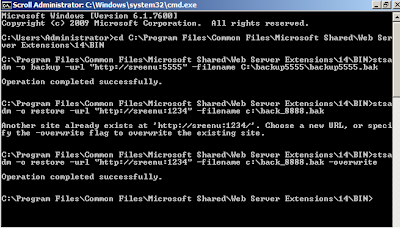
 
using powershell
PS C:\Users\Administrator> Backup-SPSite -Identity http://sreenu:5555/ -Path "c:\backup\file.bak"


PS C:\Users\Administrator> Restore-SPSite -Identity http://sreenu:4444/ -Path "c:\backup\file.bak" -Force

Sunday, July 15, 2012

Sandboxed code solution has leaked these IPoint.Disposable Objects:Microsoft.SharePoint.SpSite

Use code like as
               SPWeb myweb = properties.OpenWeb();
                myweb.AllowUnsafeUpdates = true;
           SPList mylist = myweb.Lists["Holidays List"];
     

Get Leave Days with out holidays & Week Days Using Sharepoint 2010 Event Receivers

public override void ItemAdding(SPItemEventProperties properties)
       {
           if (properties.ListTitle!="Contractor Attendance")
           {
               properties.Cancel = true;
           }
           else
           {
               DateTime Fdate = Convert.ToDateTime(properties.AfterProperties["From_x0020_Date"]).AddDays(1);
               DateTime Tdate = Convert.ToDateTime(properties.AfterProperties["To_x0020_Date"]).AddDays(1);
               TimeSpan ts = Tdate.Subtract(Fdate);
               int days = Convert.ToInt32(ts.Days) + 1;
               for (var day = Fdate.Date; day.Date <= Tdate.Date; day = day.AddDays(1))
               {
                   if (day.DayOfWeek == DayOfWeek.Saturday || day.DayOfWeek == DayOfWeek.Sunday)
                   {
                       days--;
                   }
               }
               SPWeb myweb = properties.OpenWeb();
                myweb.AllowUnsafeUpdates = true;


                SPList mylist = myweb.Lists["Holidays List"];
                    SPListItemCollection lic = mylist.Items;
                    foreach (SPListItem item in mylist.Items)
                    {
                        DateTime Hdate = Convert.ToDateTime(item["Date"]);

                        for (var day = Fdate.Date; day.Date <= Tdate.Date; day = day.AddDays(1))
                        {
                            if (day == Hdate)
                            {
                                days--;
                            }
                        }

                    }
            

               properties.AfterProperties["Days"] = Convert.ToInt32(days);
           }
          
       }

Saturday, July 14, 2012

"The form cannot be rendered. This may be due to a misconfiguration of the Microsoft SharePoint Server State Service. For more information, contact your server administrator”.

n the Start menu, click All Programs >> Microsoft SharePoint 2010 Products >> SharePoint 2010 Management Shell.

To create a service application, type the following command:


$serviceApp = New-SPStateServiceApplication -Name "StateService"
 
Create a State Service database and associate it with a service application, by typing:
 
New-SPStateServiceDatabase -Name "StateServiceDatabase" -ServiceApplication $serviceApp
 
 Create a State Service Application Proxy and associate it with the service application by typing:
 
 New-SPStateServiceApplicationProxy -Name "StateService" -ServiceApplication $serviceApp -DefaultProxyGroup

Friday, July 13, 2012

Configure User Profile Service Application

User Profile Service Application is a shared Application of SharePoint 2010 used to manage user’s profiles of organization, synchronizing profiles with active directory and creating My Sites for users.
1)  Open SharePoint 2010 Central Administration
2)  On Quick Launch, Click on Application Management and then click “Manage Service Applications” Under Service Applications Section.
3)  On Manage Service Application Page click on “New” and select User Profile Service Application.
4)  On Create New User Profile Service Application window type

   a)  Name : User Profile Service Application1
   b)  Application Pool Name : UserProfileServicePool
   c)  Configurable : POINT\Sharepoint_Farm User

After typing these values click on “Create” Button at down.
Service Application will create. After Creating Service Application, we will start necessary services for service application
 
5)  On Quick Launch menu of central Administration site click on “System Settings” then click on “Manage Services on Server” Under servers Section.
 
6)  On Services on Server window find out

   a)  User Profile Service and click on start.
   b)  User Profile Synchronization Services and click start.
7)  To see timer job, on Quick Launch of central Administration site , click on Monitoring and then click on check job status under timer jobs section.
Under Running Jobs We Must have “ProfileSynchronizationSetupJob”
 
8)  Ensure that both the services have started.
   a)  User Profile Service.
   b)  User Profile Synchronization Services.

On Quick Launch menu of central Administration click on “System Settings” then “Manage Services on Server” Under servers Section and check it.
 
9)  Also ensure that Forefront Identity Manager Service and Forefront Identity Manager Synchronization Service Has started.
 
10)  Restart IIS Server.
   a)  Go to start, right click on command prompt, then click run as administrator.
   b)  Type IISRESET
 Go to Administrative Tools then click on Services and check it.
11)   Now open our service application

On Quick Launch of central Administration site, click Application Management then “Manage Service Applications”, then “User Profile Service Application1” Link. We will have following page, where we can manage user profiles, synchronization with Active Directory, setup My Sites etc.
 

Creating connection with Active Directory

1)  On Quick Launch of central Administration Site, click Application Management then “Manage Service Applications”, then “User Profile Service Application1” Link.
2)  On Synchronization Connections page click on “Create New Connection”
3)  On add new synchronization connection page use following values.
   a)  Connection Name: POINT Active Directory Users.
   b)  Type : Active directory
   c)  Forest Name : POINT.COM
   d)  Account Name : POINT\SharePoint_Farm

4)  On Quick Launch of central Administration, click Application Management then “Manage Service Applications”, then “User Profile Service Application1” Link.
And click on “Start Profile Synchronization”. Synchronization Process will start; look at right side on page we have status “Synchronizing”
It will take 10 to 15 to finish this process. Press F5 until Synchronization status is Idle. 


Reference link


In SharePoint 2010, Normal search is working and People search result is not working fine. Why? Finally, you may have configured the user profiles synchronization & Search services. Also, you may be able to see the number of profiles under "User profile service" and contents under "Search Service".

Finally, you may have configured the user profiles synchronization & Search services. Also, you may be able to see the number of profiles under "User profile service" and contents under "Search Service". 


Reason:
You may have forgot to add the URL to crawl the people in Search service "ContentSource". So, just add the exact url which will start "SPS3://".

Example:
SPS3://km.sensoft2000.com (just an example)
 
sps3://sreenu:1111
 Thats it....


If you are trying to configure a new synchronization connection in your SharePoint 2010 environment and you get the error:Synchronization Connection: “MOSS MA not found”

If you are trying to configure a new synchronization connection in your SharePoint 2010 environment and you get the error:
 Check that the Forefront Identity Manager Service is started in your services.msc (not sure why mine wasn’t started automatically). 


Check that the Forefront Identity Manager Service is started in your services.msc (not sure why mine wasn’t started automatically).