Wednesday, October 3, 2012

Recovering a SQL Server Database from Suspect Mode


Please use this script to recover database from suspect mode in MS SQL Server 2008, 2005 through SQL Server management Studio.


Follow below steps to recover database from suspect mode:


  1. ALTER DATABASE [database_name] SET EMERGENCY 
  2. DBCC checkdb('database_name') 
  3. ALTER DATABASE [database_name] SET SINGLE_USER WITH ROLLBACK IMMEDIATE 
  4. DBCC CheckDB ('database_name', REPAIR_ALLOW_DATA_LOSS)
  5. ALTER DATABASE [database_name]  SET MULTI_USER


EXEC sp_resetstatus 'SharePoint_AdminContent_db71de42-7853-45fa-b5c2-f401913bf791';
1.ALTER DATABASE "SharePoint_AdminContent_db71de42-7853-45fa-b5c2-f401913bf791" SET EMERGENCY

2.DBCC checkdb('SharePoint_AdminContent_db71de42-7853-45fa-b5c2-f401913bf791')

3.ALTER DATABASE "SharePoint_AdminContent_db71de42-7853-45fa-b5c2-f401913bf791" SET SINGLE_USER WITH ROLLBACK IMMEDIATE

4.DBCC CheckDB ('SharePoint_AdminContent_db71de42-7853-45fa-b5c2-f401913bf791', REPAIR_ALLOW_DATA_LOSS)
ALTER DATABASE "SharePoint_AdminContent_db71de42-7853-45fa-b5c2-f401913bf791" SET MULTI_USER
5.DBCC CheckDB ('SharePoint_AdminContent_db71de42-7853-45fa-b5c2-f401913bf791')

Wednesday, August 22, 2012

Add & Delete Top& Left Navigation Links using Object model in Sharepoint

  Adding Left Navigation Link
SPSite quickLaunchSite = new SPSite("http://sreenu:5555/Test");
         SPWeb quickLaunchWeb = quickLaunchSite.OpenWeb();
SPNavigationNodeCollection quickLaunchNodes = quickLaunchWeb.Navigation.QuickLaunch;
        //add left navigation internal site
  SPNavigationNode internalMenuItem = new SPNavigationNode("Links", "/uday/SitePages/Home.aspx", false);
                 //add left navigation external site
      quickLaunchNodes.AddAsFirst(internalMenuItem);
  SPNavigationNode externalMenuItem = new SPNavigationNode("SharePoint Blog", "http://sreenuknowledge.blogspot.in/", true);
 quickLaunchNodes.AddAsFirst(externalMenuItem);
            quickLaunchNodes.Navigation.QuickLaunch[0].Delete();  
          quickLaunchWeb.Update();
            Console.WriteLine("Successfulled added");
            Console.Read();


Deleting Left Navigation Links
quickLaunchNodes.Navigation.QuickLaunch[0].Delete();  

Adding Top Navigation Link
  SPNavigationNodeCollection quickLaunchNodes = quickLaunchWeb.Navigation.TopNavigationBar;

Deleting Top Navigation Links
 quickLaunchNodes1.Navigation.TopNavigationBar[0].Delete();


Configure Best Bet in SharePoint 2010 Search


 Create a New Keyword

  1. In your browser, navigate to your home page of your site.
  2. Click Site Actions, and then click Site Settings.
  3. In the Site Collection Administration section, click the Search Keywords link.
  4. In the Manage Keywords page, click the Add Keyword link.
  5. In the Add Keyword page, in the Keyword Information section, enter tasks into the Keyword Phrase text box.
Create an Associated Best Bet for the Keyword


  1. In the Add Keyword page, in the Best Bets section, click the Add Best Bet link.
  2. In the Add Best Bet dialog, enter: https:\\hostaddress/lists/tasks/allitems.aspx in the URL text box
  3. Enter in Team Tasks in the Title text box.
  4. Click the OK button, and then click the OK button in the Add Keyword page.
  5.  
  6.  

    1. Enter the word sreenu into the Search text box, and then click the Magnifying Glass to execute a search.
    2. Observe that sreenuknowledge shows up at the top of the search results with a link to the URL of the page.
    3.  
    4.  

errorType"FileNot FoundExpection In sharepoint2010"


Configuring Enterprise Search in Sharepoint2010

2. SharePoint Server Publishing (Manage site features under "Site Actions").

3)Now go to your site -->Site Actions--> New Site,
Specify Title and Description,website address,template selection as 'Enterprise Search Center' under Enterprise tab.
4)for remaining fields use default settings. Then click on 'Continue'.
Now copy the search center site url(which looks like 'http://<servername>:6969/Search/Pages/default.aspx'
Now Go To site's SiteSettings-->click on  'search settings under' Site Collection Administrator.
Select 'Enable custom scopes by connecting this site collection with the following search center' and
specify search center site url upto pages and remove "/default.aspx" from site url (i.e http://sreenu:6969/Search/Pages) And now click on "OK".
Now we need to configure Search Service Application..


5)Go to Central Administration-->Manage service application under Application Management --> Click on 'Search Service Application',Now Click on content sources(under Crawling).
NOTE: bydefault one content source available in 'Content Sources' i.e Local SharePoint sites. whenever we create new web application that will automatically adds to this content source.

If you want to create new content source for your site u have to remove ur site url from the default Content source i.e 'Local SharePoint sites'.


6)Now click on Content sources under Crawling, click on 'New Content Source'.
Specify Name 'SreenuSharePoint6969', select 'SharePoint sites' in Content Source Type, Specify Start Addresses to which site u want to search
i.e
http://<servername>:6969
sps3://<servername>:6969


7)Check 'Start full crawl of this content source' and click 'OK'.
it will start full crawling content source.


After Completion of crawl, click on Scopes under 'Queries and Results'.
Click on New Scope.


8)After creation of scope add rules to the scope, in add scope rule select 'Content Source' as Scope Rule Type then select your SharePoint content as Content Source.Then click on "OK".
it will takes some time to available for search.
Upto now we done modification in central administration.


9)Now to go to your SharePoint,
 Go to SiteActions--> click 'Search scopes' under Site Collection Administration.
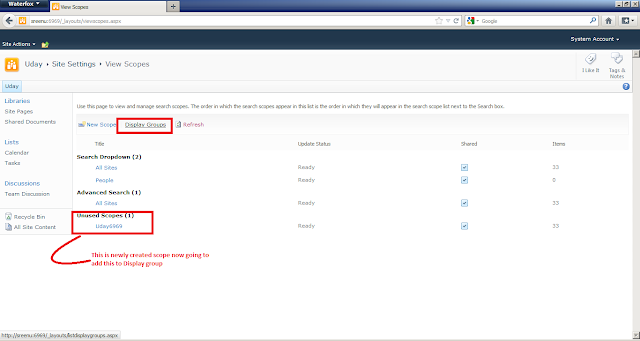
Click on 'Display Groups'.
 Select Search Dropdown's Edit Display Group.
 Check your Scope (which was created in central admin). then Click on "OK"


10)Now select Advanced Search's Edit display group.
 11)Check your scope  (which was created in central admin). then Click on "OK".
Search Settings are completed and your sharepoint site is ready for search.
12)Now go to your sharepoint site and search ...

Note: till now i didnt added any new document/item to sharepoint site.so for testing, am testing my sharepoint site with the key word 'Annoucement' because by default this list is available in sharepoint site.

13) If you add new document and try for that document in search it wont display that document in search result. we need to crawl content source then only that document available for search.

Now am going to show add new document and how to make it available for search.


 14)added one document to shared document. i.e "searchsettingdoc.txt"
b. Go to central administration -->application management services-->search service application -->Content Sources under Crawling.
c. select your content source and select 'Start Incremental Crawl'. it will start incremetal crawl.
d. after completion of incremental crawl go to your site and search for your newly added document now..


Sunday, July 29, 2012

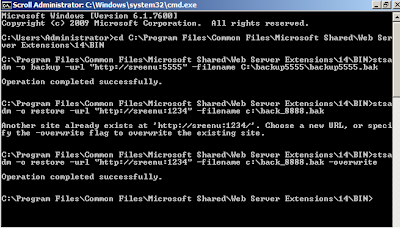
Backup & Restore SharepointSite

 
C:\Program Files\Common Files\Microsoft Shared\Web Server Extensions\14\BIN>stsa
dm -o backup -url http://praveen:8888 -filename C:\backup\back_8888.bak

stsadm –o restore –url <URL of the site collection> -filename <Name of the backup file> -overwrite

 
using powershell
PS C:\Users\Administrator> Backup-SPSite -Identity http://sreenu:5555/ -Path "c:\backup\file.bak"


PS C:\Users\Administrator> Restore-SPSite -Identity http://sreenu:4444/ -Path "c:\backup\file.bak" -Force

Sunday, July 15, 2012

Sandboxed code solution has leaked these IPoint.Disposable Objects:Microsoft.SharePoint.SpSite

Use code like as
               SPWeb myweb = properties.OpenWeb();
                myweb.AllowUnsafeUpdates = true;
           SPList mylist = myweb.Lists["Holidays List"];
     

Get Leave Days with out holidays & Week Days Using Sharepoint 2010 Event Receivers

public override void ItemAdding(SPItemEventProperties properties)
       {
           if (properties.ListTitle!="Contractor Attendance")
           {
               properties.Cancel = true;
           }
           else
           {
               DateTime Fdate = Convert.ToDateTime(properties.AfterProperties["From_x0020_Date"]).AddDays(1);
               DateTime Tdate = Convert.ToDateTime(properties.AfterProperties["To_x0020_Date"]).AddDays(1);
               TimeSpan ts = Tdate.Subtract(Fdate);
               int days = Convert.ToInt32(ts.Days) + 1;
               for (var day = Fdate.Date; day.Date <= Tdate.Date; day = day.AddDays(1))
               {
                   if (day.DayOfWeek == DayOfWeek.Saturday || day.DayOfWeek == DayOfWeek.Sunday)
                   {
                       days--;
                   }
               }
               SPWeb myweb = properties.OpenWeb();
                myweb.AllowUnsafeUpdates = true;


                SPList mylist = myweb.Lists["Holidays List"];
                    SPListItemCollection lic = mylist.Items;
                    foreach (SPListItem item in mylist.Items)
                    {
                        DateTime Hdate = Convert.ToDateTime(item["Date"]);

                        for (var day = Fdate.Date; day.Date <= Tdate.Date; day = day.AddDays(1))
                        {
                            if (day == Hdate)
                            {
                                days--;
                            }
                        }

                    }
            

               properties.AfterProperties["Days"] = Convert.ToInt32(days);
           }
          
       }

Saturday, July 14, 2012

"The form cannot be rendered. This may be due to a misconfiguration of the Microsoft SharePoint Server State Service. For more information, contact your server administrator”.
n the Start menu, click All Programs >> Microsoft SharePoint 2010 Products >> SharePoint 2010 Management Shell.

To create a service application, type the following command:


$serviceApp = New-SPStateServiceApplication -Name "StateService"
 
Create a State Service database and associate it with a service application, by typing:
 
New-SPStateServiceDatabase -Name "StateServiceDatabase" -ServiceApplication $serviceApp
 
 Create a State Service Application Proxy and associate it with the service application by typing:
 
 New-SPStateServiceApplicationProxy -Name "StateService" -ServiceApplication $serviceApp -DefaultProxyGroup